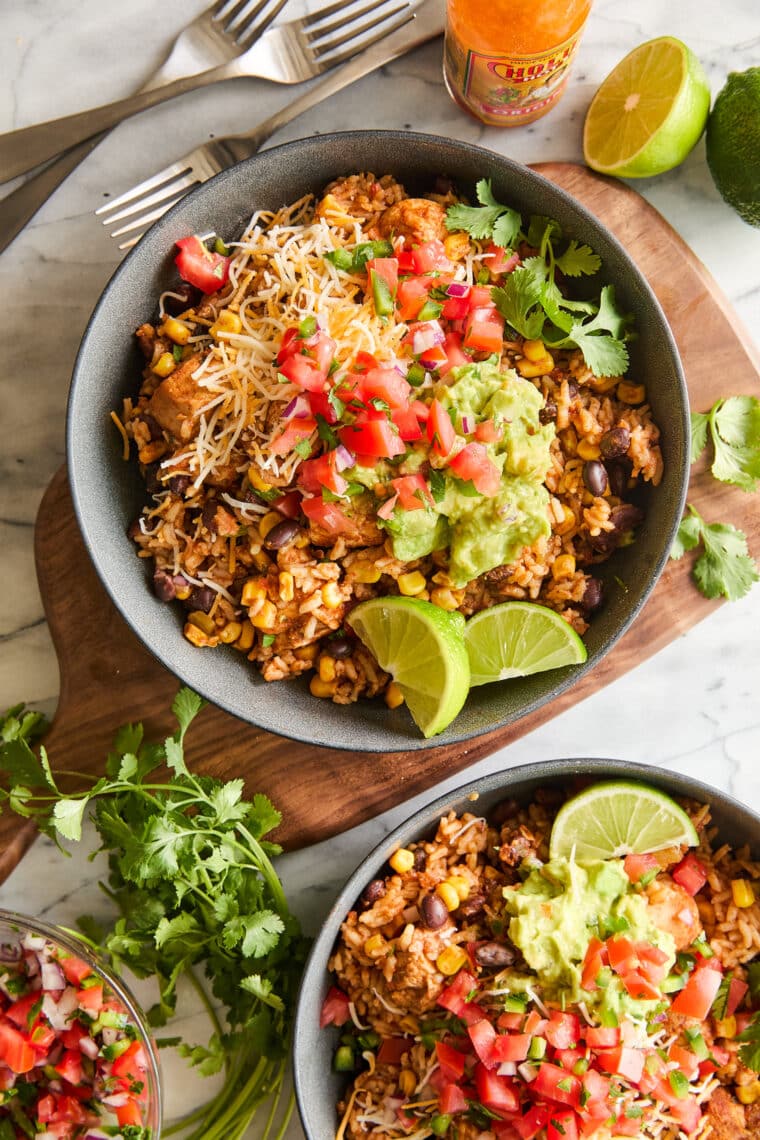
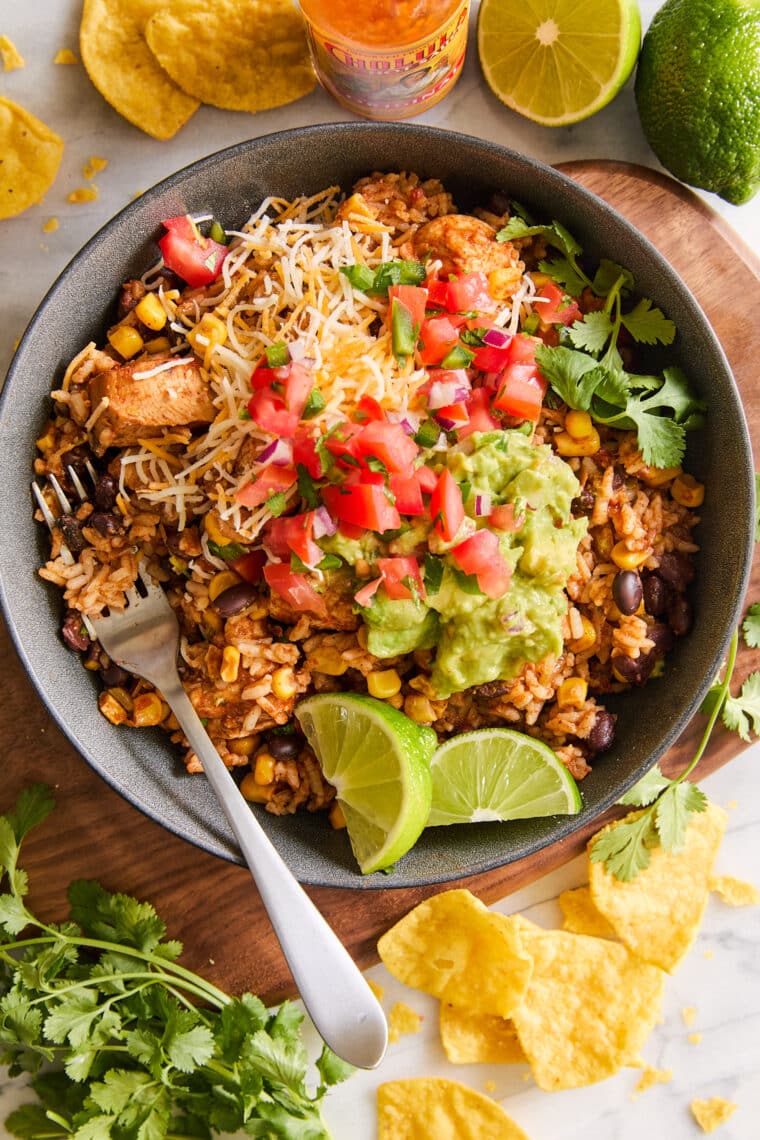
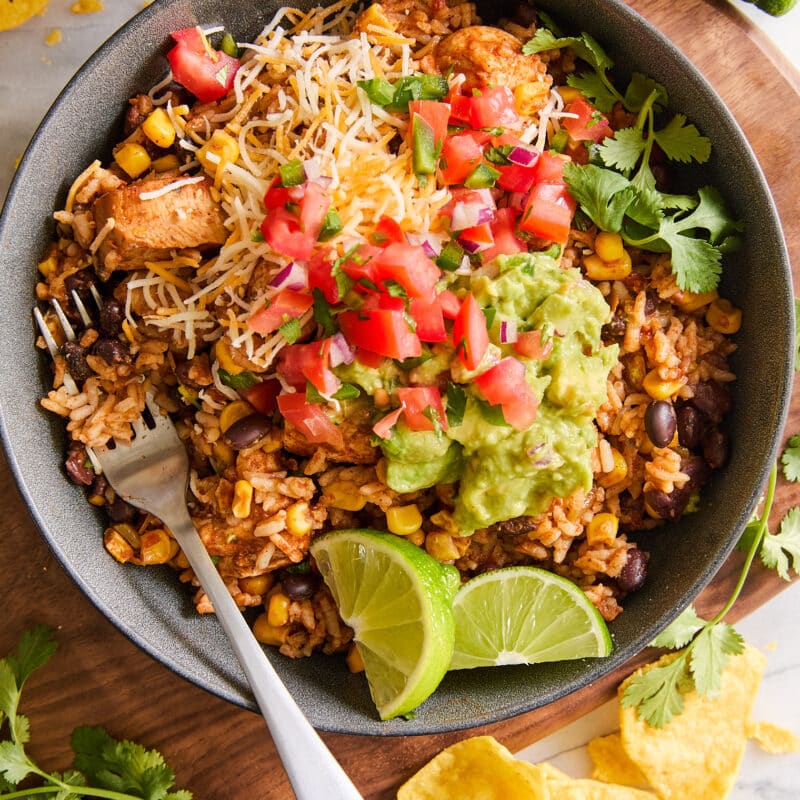
Instant Pot 20 Minute Chicken Burrito Bowls
This post may contain affiliate links. Please see our privacy policy for details.
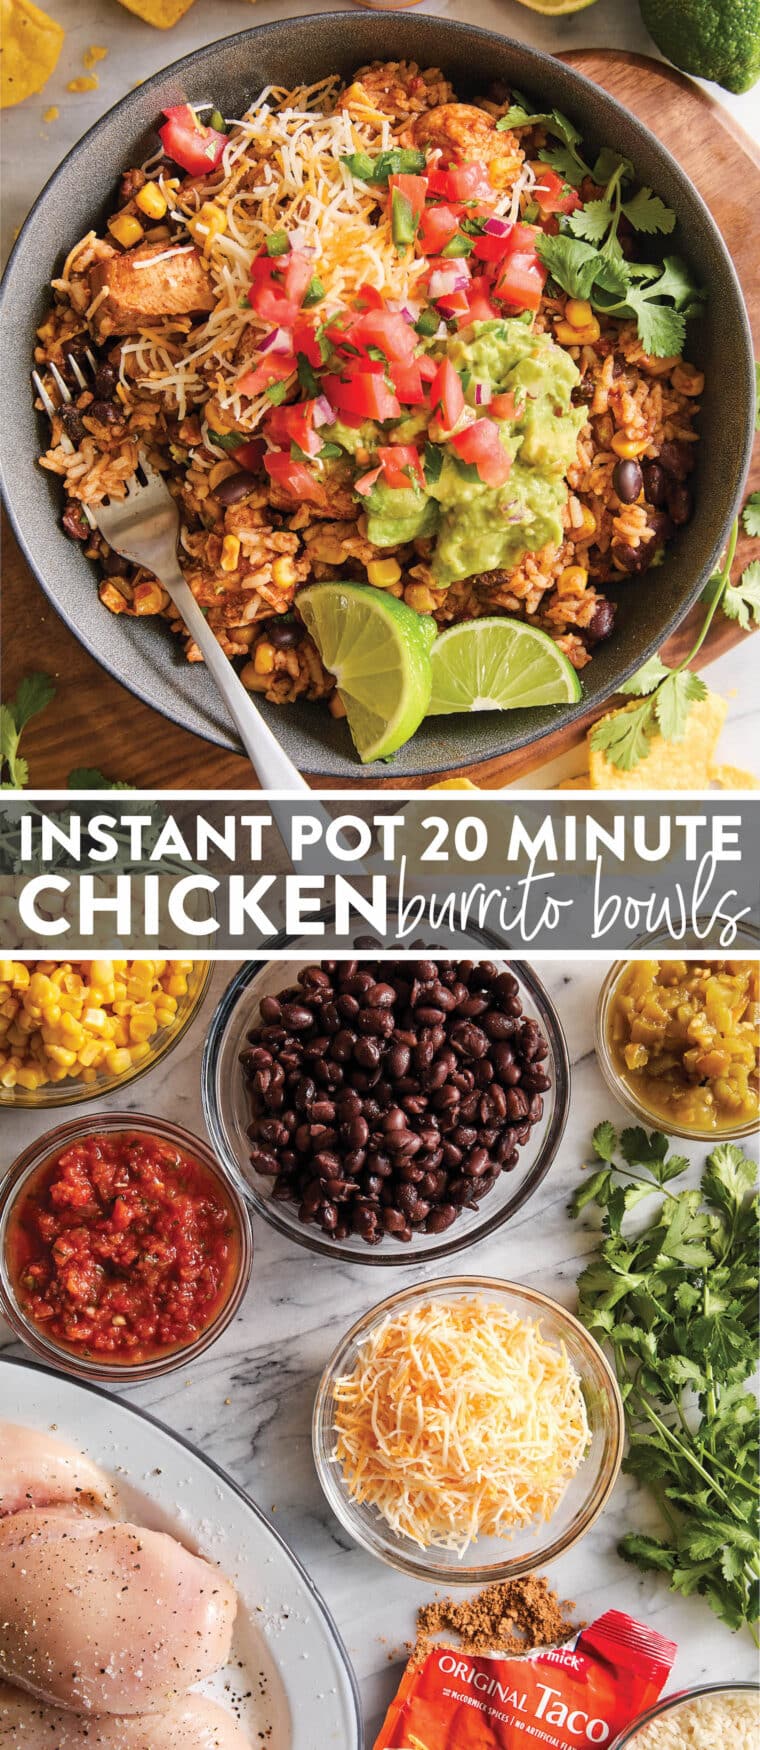
Comes together in less than 10 min prep! The chicken is so tender and the flavors are so good.
Featured Comment
This is a burrito bowl recipe I keep coming back to again and again. And this was the first Instant Pot (IP) recipe I have ever tested that converted me to the pressure cooker fan club. With one pot, tender, juicy chicken and perfectly cooked rice with the easiest clean up in the history of the world, I was completely hooked with the IP magic.
reasons to make instant pot 20 minute chicken burrito bowls
- All-in-one Instant Pot dinner. With the help of the Instant Pot, this is the best kind of dump-and-go dinner recipe. There’s minimal prep time here – no sautéing, no nothing. Throw everything right into the pressure cooker, set your time, and walk away. Dinner will be on the table in lightning fast speed, 20 minutes to be exact.
- Family-friendly. Burrito bowls are a guaranteed hit with the entire family, adding in as little or as many toppings as desired, a little bit of something for everyone to enjoy.
- Great for meal prep. This keeps for 2-3 days, ideal for making these ahead of time for meal prep and reheating as needed.
- Flexible, forgiving recipe. Most of the ingredients can easily be swapped out or omitted as needed. Don’t have black beans? Use pinto or kidney beans. Don’t have canned corn? Skip it or use frozen corn kernels. Want to use thighs over breasts? Give it a quick swap.
tips and tricks for success
- Use chicken breast or thighs. Both will work beautifully here – breast will be leaner whereas thighs will have more fat, yielding more tender chicken than the former. Not a fan of chicken? Ground beef is also a great swap!
- White rice is ideal. Long-grain white rice such as jasmine or basmati rice is best. Brown rice will take too long to cook here.
- Make it spicy. Add in 1 diced jalapeno for a kick of heat!
- Add your favorite toppings. Diced avocado, shredded Mexican blend cheese, cilantro, a squeeze of fresh lime juice, crispy tortilla strips or crushed tortilla chips when you’re in a pinch are all great options.
- Reheat with a splash of chicken stock. When reheating, add a splash of chicken broth or water.
pro tip
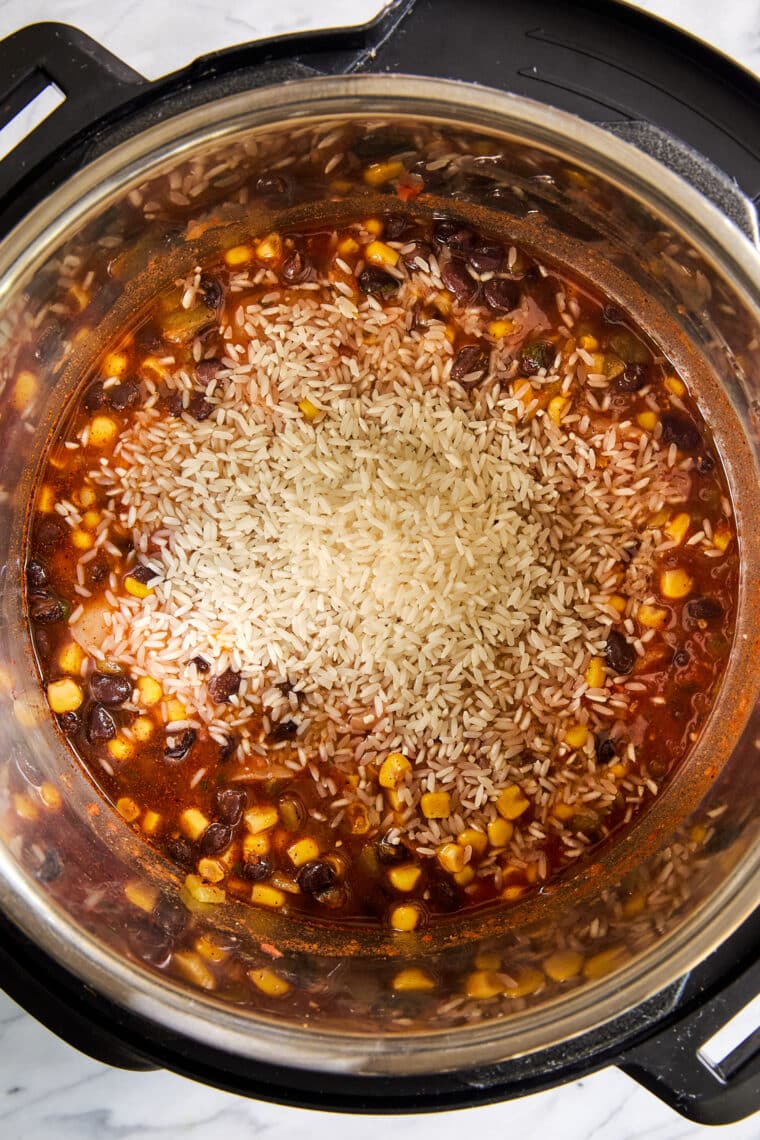
Do not stir in the rice.
Adding in the rice at the very end without stirring will prevent the rice to sink to the bottom of the Instant Pot (this is what signals the dreaded burn notice). Layer and sprinkle the rice on top, patting down slightly to submerge. Do not stir. This will lead to burrito-goodness-flavored tender, fluffy rice.
what to serve with chicken burrito bowls
Tools For This Recipe
6-qt Instant Pot®
Instant Pot 20 Minute Chicken Burrito Bowls: Frequently Asked Questions
Black beans, pinto beans or kidney beans are all great here.
Absolutely! To make this a dairy-free chicken burrito bowl, skip the cheese.
Yes! Skip the chicken, add an additional can of beans and use vegetable broth instead.
Leftovers can be stored in an airtight container in the fridge for 2-3 days.

Instant Pot 20 Minute Chicken Burrito Bowls
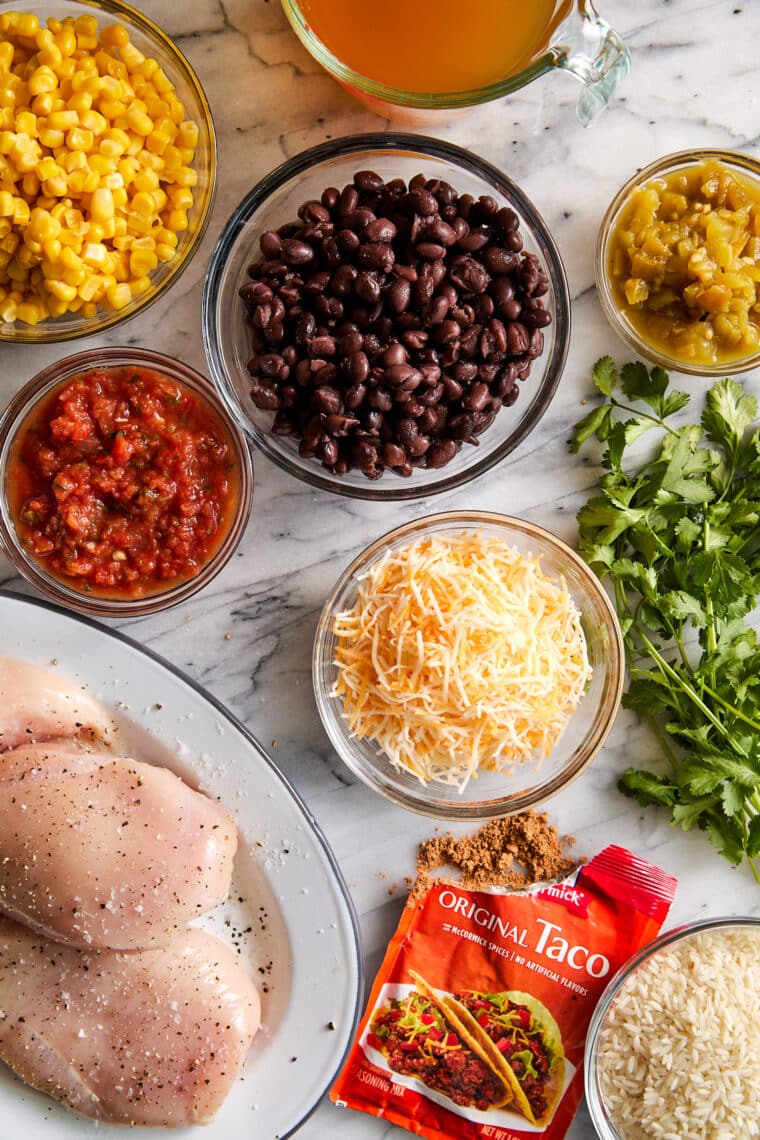
Ingredients
- 1 pound boneless, skinless chicken breasts, cut into 1-inch chunks
- 1 cup low sodium chicken broth
- 1 (1.25-ounce) package taco seasoning
- 1 (15-ounce) can corn kernels, drained
- 1 (15-ounce) can black beans, drained and rinsed
- 1 cup salsa, homemade or store-bought
- 1 (4.5-ounce) can chopped green chiles
- 1 cup long-grain white rice
- 1 cup shredded Mexican blend cheese
- 2 tablespoons chopped fresh cilantro leaves
Equipment
Instructions
- Add chicken, chicken broth and taco seasoning to a 6-qt Instant Pot® and gently toss to combine.
- Stir in corn, black beans, salsa and green chiles. Without stirring, add rice.
- Select manual setting; adjust pressure to high, and set time for 10 minutes. When finished cooking, quick-release pressure according to manufacturer’s directions. Stir in cheese until melted, about 1 minute.
- Serve immediately, garnished with cilantro, if desired.
Video
Did you make this recipe?
Tag @damn_delicious on Instagram and hashtag it #damndelicious!


I’ve commented previously, but wanted to add a followup. This recipe is absolutely delicious and we love it, but a word of warning: **It is a gigantic sodium bomb.**
Using the ingredients as presented yields somewhere between 4000-5000mg of sodium per batch. The recipe indicates it’s four servings, which is 1000-1250mg per serving. That said, for our family this recipe yields something closer to six servings, which I feel is a more reasonable serving size, but still a lot of sodium.
Anyway, half or more of your daily max sodium intake in a single meal is a deal breaker for anyone that’s at all conscious of heart health.
The biggest culprits are the salsa (around 1600-1700mg), cheese (approx. 1000mg if using cheddar like we do) and taco seasoning (around 1100mg for the package, and that’s the reduced sodium variety!)
So we make some modifications to make this slightly less lethal (albeit slightly less Omg delicious), which I’d recommend to anyone that has this in their weekly meal rotation for their family.
1. Use No Salt Added chicken broth. Not just low sodium, but NO sodium.
2. Make your own fresh salsa if you have the time/wherewithal, and watch the amount of salt you use (store bought has equivalent to ~2/3 tsp of table salt per cup, at least for the brand we buy). Otherwise, reduce the amount of store bought salsa you use.
3. Reduce the amount of cheese. One cup is a LOT of cheese in this anyway. We usually do about 2/3 of a cup (around 76g if you have a kitchen scale. Way easier to measure 🙂 )
4. Use no salt varieties of the canned beans and corn. No brainer here.
5. Scale back the taco seasoning or make your own where you have control over the amount of salt in it. Store bought seasoning is LOADED with sodium (about 1/2 tsp table salt per package). If using store bought, I usually only use 1/2-2/3 of the package.
6. Use fresh chopped chilies instead of canned (haven’t tried this yet, myself). Canned chilies here are almost 400mg sodium per can.
7. Of course, this will all result in this meal being noticeably less flavourful than it otherwise would. So to offset the lack of flavour from the salt, we jazz it up with some citrus after cooking (lime juice is great with this). There are also some great hot sauces that add flavour without nuking it with salt as well (note: not Frank’s.. It is also lethally salty. There are lots of proper hot sauces out there that taste better anyway)
With the above adjustments, we manage to get it down to around 2500-3000mg for the batch, which is far more reasonable when you spread it out over 4-6 servings.
Anyway, hope this big wall of text helps someone out there. Bon appetit!
I doubled the recipe and my instant pot did keep giving the BURN notice but I just decided to ignore it and when I opened it up everything was cooked and fine! I don’t know if I’d recommend ignoring the Burn notice but it worked well for me. Tastes delicious and I LOVE that I don’t have to make the rice separate.
Do you have to double the time if you double the recipe?
I followed the instructions to the T and the rice didn’t cook. It should have been stirred in.
I’ve been making this just about every other Sunday and it’s the perfect comfort meal. I had a cold a couple weeks ago and wanted to turn up the spice to help clear my sinuses so I added a small can of chipotle peppers in adobo sauce. Holy cow was the delicious and it also did the trick. I’m making it again today with the chipotle peppers.
Everyone in my family loves this recipe. I make it about twice a month now. A big hit!
Super quick and easy to make and it tastes soo good!
I made this for dinner last night, and had it for lunch today. I took a chance, as I googled for Mexican Instant Pot recipes in the store parking lot. This recipe is my new favorite! Comfort food at its best. I can’t eat dairy, but I used Vio-life vegan cheese and it was absolutely delicious! I added avocado, really nice. Thank you for this yummy, easy recipe. I’d give it 10 stars if I could.
How would I adjust with no rice? I wanna make the rice on the side
I just make my rice on the side and prepare the rest of the recipe as is.
I love a good Instant Pot dinner! I subbed in brown rice and a half cup of water. (Mine needed 20 min. for the rice to cook.) We gobbled it down to the last grain of rice! We topped ours with cilantro, avocado, and a squeeze of lime. Bet it would be yummy tucked into flour tortillas!
This exceeded my and my family’s expectations. My kids who usually don’t like new things all took seconds. Plenty of food for family of 5. I used the Costco medium salsa and basmati rice. Only thing I omitted was cilantro because I didn’t have it handy, but it probably would have been good. Had some Tostitos “hint of lime” chips which went really well with this.
Love this recipe! Once it’s finished I stir in cheese to thicken, and then put spoonfuls into tortilla wraps in a Pyrex pan. cover with enchilada sauce and cheese, bake at 375 for 15 min and you’ve got enchiladas!
This was excellent. Used Thai Jasmine Rice. Added an extra 1/2 cup of broth as per one reviewer. Used Penny’s Pico De Gallo . After it was cooked, added cilantro as per recipe, fresh tomatoes, avocado, tortilla chips and extra cheese as toppings. Big hit with the family. This I will be making again.
This recipe is excellent! Thank you for sharing. I’m not a fan when people say “it’s great, but I changed a few things.” But I did out of necessity! I was missing items. I had no salsa, so I substituted with the remainder of a jar of marinara and half an onion. No can of chopped peppers but I had a home grown jalapeño. Served with a side of sour cream because of the extra kick. Awesome meal!
I am here to admire the enamelware. Love it.
I cooked this exactly as stated with one minor exception. I sautéed my chicken in olive oil for about five minutes first. Then followed all the other instructions exactly. It was perfect! Everyone loved it!
A consistent meal in our family’s rotation. Sooo delicious. Any idea the nutritional information?
I haven’t totted up the calories or fat, but in answer to your question, this is a major sodium explosion (around 1000-1250mg sodium per serving as presented in the recipe. There’s a reason it’s so delicious 🙂 )
I’ve made a comment on the recipe with how my family adjusts this to make it a bit more manageable salty, hopefully it helps.
My husband requests this weekly, and he’s very picky!! This recipe is amazing… Flavourful and hearty.
I tweak just a few things:
Add another 1/2 cup chicken broth (so 1.5 cups total)
Sub 1 can Rotel (mild for our toddler) for the can of green chiles
Sub the corn kernels for a can of Delmonte Corn Medley – Mexican Style
Right before I add the rice I give everything a good stir, then spread the rice over the top and press it into the liquid with a spatula. I cook for 12 minutes instead of 10 just as a matter of preference.
Damn delicious!
Do you also add the salsa along with the rotel? Thanks!!
I literally make this recipe at least once a week and my entire family loves it! I have never gotten a BURN notice and I think that it is because after placing all of the ingredients in the pot (not the rice), I stir it all. This way, the liquid is well distributed and reaches the bottom and you don’t have your dryish chicken pieces sitting at the bottom just waiting to stick to the pot resulting in the dreaded burn notice. I also sprinkle the one cup of rice over the top and pat it all with the top of my hand to make sure that it is all just moistened by the liquid in the pot. This really is delicious as is. I use a taco seasoning that I make myself and keep in a jar in my cupboard (1 tbls chili powder, 1.5 tsp cumin, paprika, 1 tsp salt, pepper, 1/2 tsp paprika, 1/4 tsp. garlic powder, onion powder, oregano). Try it! You’ll love it.
Do you think brown rice would work ok?
This is my “GO TO” dinner with time is tight. With flash-frozen chicken breast tenders in the freezer, this can get dinner on the table in about 30 minutes! Thanks for the dinner secret weapon!
Would it work to double this recipe in a 6-qt instant pot? Or would it be too full?
I MAY KNOW THE REASON FOR THE BURN NOTICE:
I have not tried this recipe yet (I’m going to tonight) but, I may know what’s behind the burn notice.
You cannot use any flour in the Instant Pot DURING PRESSURE-COOKING MODE. It will coat the bottom of the pot and cause it not to be able to come to pressure, and you’ll get alerts. I learned this the hard way when I was experimenting with my own version of chicken heart (yes, my kids LOVE them!) stroganoff. I added flour and cornstarch thinking, oh, what a great idea. It will help to thicken it up. Well… NO! I thought my IP broke until I did research online to learn that you should NEVER use flour (or flour-like substances, I think) in any IP. The flour and cornstarch totally coated the bottom of the pan. I cooked it off on the stove and it still turned out awesome, thankfully.
Why do I tell you this… Most pre-packeaged taco seasoning has flour (or another flour-like thickener) in it.
NOTE: You can definitely use flour (and probably anything else) in the IP during saute mode, when finishing something off or only using in saute mode.
I’m going to try this with my flourless, homemade taco seasoning. (I don’t like store bought, WAY TOO MUCH SODIUM.) I’ll let you know how it goes.